Are you a fan of Viking weapons and history? Do you want to channel your inner Viking warrior and create your own Viking axe? Well, you’re in luck! In this short guide, we’ll take you through the steps of creating your very own Dane axe. So grab your tools and let’s get started!
Step 1: Gather Your Materials Before we jump into the process, it’s crucial to gather all the necessary materials. For creating a Viking axe, you’ll need the following:
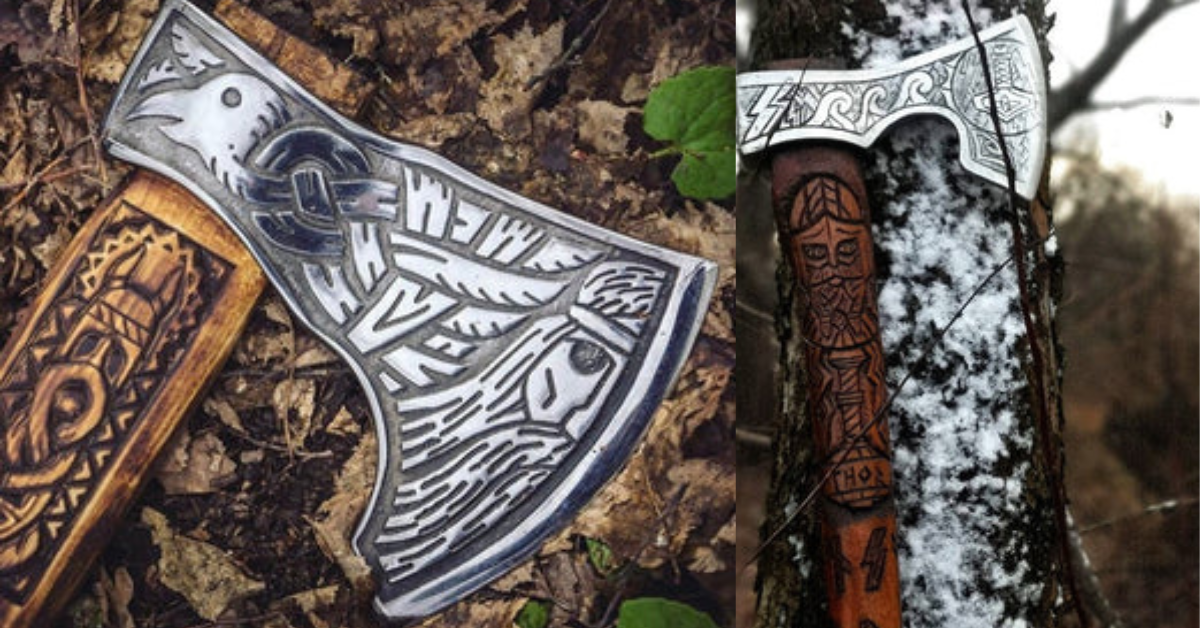
1. Axe head: Look for a high-quality steel axe head with a blade length of approximately 7 to 9 inches. You can find axe heads at your local hardware store or online.
2. Handle: Opt for a strong, durable wood for the handle. Hickory or ash wood are popular choices due to their strength and durability. Ensure that the handle is approximately 3 feet long and has a comfortable grip.
3. Epoxy resin: To attach the axe head securely to the handle, you’ll need epoxy resin. It acts as a powerful adhesive and ensures the axe head remains firmly in place during use.
4. Sandpaper: Get a variety of sandpaper grits (ranging from coarse to fine) to prepare the wood for staining and polishing.
5. Stain and finish: Choose a wood stain of your liking to enhance the appearance of the handle. Additionally, you’ll need a clear coat finish to protect the wood from damage and give it a glossy look.
Step 2: Preparing the Axe Head Once you have all the materials, it’s time to prepare the axe head for attachment. Take your axe head and clean it thoroughly using a wire brush to remove any rust or debris. Once clean, carefully etch any decorative patterns or designs on the axe head using a small chisel or engraving tool. This step will add a unique touch to your Dane axe.
Step 3: Attaching the Axe Head Now comes the exciting part – attaching the axe head to the handle. Start by applying a generous amount of epoxy resin to the eye of the axe head. Make sure you apply enough resin to ensure a strong bond. Then, carefully place the handle into the eye of the axe head, ensuring it is aligned properly. Allow the epoxy resin to dry completely according to the manufacturer’s instructions. This typically takes a few hours.
Step 4: Shaping and Sanding the Handle With the axe head securely attached, it’s time to shape and sand the handle to your desired grip and finish. Use a wood rasp or file to shape the handle according to your preference. Smooth out any rough edges using coarse-grit sandpaper and progressively move to finer grits to achieve a smooth finish.
Step 5: Staining and Finishing To bring out the natural beauty of the wood, apply your chosen wood stain using a clean cloth or brush. Ensure an even application, and let it dry completely. Once dry, apply multiple coats of clear coat finish, allowing each coat to dry thoroughly. This will protect the wood and give it a polished, glossy look.
And voila! You have successfully created your very own Dane axe. It’s a true masterpiece that reflects the craftsmanship of the Viking warriors. Now, it’s time to wield your creation with pride and embrace your inner Viking!
Remember, creating a Viking axes require careful attention to detail and safety precautions. Always handle your tools responsibly and wear appropriate safety gear, such as gloves and eye protection. Happy axe-making!